test

Showing posts with label Website Creation and Management. Show all posts

Tuesday, 9 June 2015

Newsletter and Small Business


All you small online business owners or bloggers who are doing the marketing for your site on your own may have heard about Newsletter during your research. For all those who haven’t heard or yet to start with marketing, here’s a brief explanation. Newsletter service is a service which enables you to send updates and other emails related to your website to various lists of subscribers who have subscribed to the service in some way.  (They are different ways to add subscribers to your newsletter, will discuss this in the next segment.)

If you are still not using any newsletter service, you may be finding it hard to bring back your visitor once they leave your site. You may be using various options for driving traffic to your website. No matter what way you do it, all the effort is not really worth unless you can bring the visitor back again and again to your site.

Yes, we all know ‘Content is the King’ in terms of driving traffic and you may claim your content to be the best. But people these days do not remember their own cell phone numbers, they save it in their contact list so that they can read it to those who ask for the number, do you really think you can make your website remembered by everyone who visits your site? Okay, you may say they will bookmark your site or save it somewhere so that they can access it again later. But after all your effort marketing your site and bringing a visitor to the site, can you just sit and expect them to bookmark your site and come back again and again? No definitely not.  That’s where Newsletter comes into picture.

Not every visitor visiting your site subscribes to your newsletter. But even if 10% to 20% of the visitors do subscribe, on an average you can expect them to come back to your site atleast for 5 more times when they receive an email about the update in your website. This makes your website traffic (10 to 20) % x 5 which will be (50 to 100) % more than earlier. Without a newsletter you lose all these recurring visits. I’m trying out some newsletter for my site. I will update soon with my experience on which worked best for me. 


Share this Post Share to Facebook Share to Twitter Pin This

Wednesday, 17 December 2014

How to add .htaccess file and edit it in your cPanel.

The .htaccess file is a directory level file and it is a configuration file. It is used to manage the security restriction for the specific folder in which it is present. 

In order to add any code to the ‘.htaccess’ file, first you need to check if it already there in your file list. Usually the .htacccess file is present in the root directory since this will let us manage the entire set of files for a site. Root folder for the account differs on various platforms. If you are using cPanel, check in ‘public_html’. You will find the file there, if it is already there.


If it is not there by default, you need to create it or upload it. Uploading a .htaccess file is not like uploading any other file. It’s a simple work. But most of the times it is difficult to find out how exactly to do this because you will not find proper instructions anywhere since it is ignored as basic knowledge. For bloggers who want to do such simple fixing and editing on their own, here are the simple steps on how to do it yourself. 


How to create an .htaccess file?

1.Open a notepad in your computer and save it as ‘test.htaccess’.  You can keep the file blank. 

2. Now upload this file to your web file account or hosting account under ‘public_html’ folder via cPanel. 


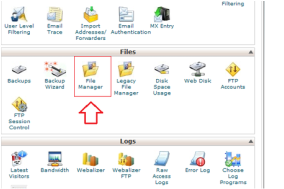
3.In order to upload the file, go to FileManager in your cPanel.

4.Click on ‘Upload’.                                           


5.Browse for the file saved earlier in your computer, ‘test.htaccess’.  Let the permission for the file be 644


6.Now go back to the FileManager and refresh it, you can see the file just uploaded listed there. It will be saved as ‘test.htaccess.txt’.


7. Select the file by clicking on it and right click on it. You will see the option to rename the file. 


8. Rename the file from ‘test.htaccess.txt’ to just ’.htaccess’.


9.    In order to edit this file, select the file and right click as in earlier step, you will see the ‘Edit’ option there. Click on it and then you can see the space where you will be able to add your code. Just add the code and click on ‘Save Changes’. 


Most of the application like WordPress plugins requiring ‘.htaccess file’ editing will write the code to the file automatically when the permission is set properly. However, sometimes you may need to edit and write the code manually. 


Share this Post Share to Facebook Share to Twitter Pin This

Tuesday, 9 December 2014

404 Error while accessing categories after customizing Permalink?

I’ve been trying to customize my permalink structure since few days because the default structure of the URL’s is not at all user friendly and also it doesn’t really look good. Customizing the Permalink structure can be quite simple if you do it before you start creating pages or writing posts. 

By default the structure will be:  


http://example.com/post_id .  


You can set it to show your post name or published date or category and post name etc as per your requirement. Requirement might different depending on what exactly is your site is. Say if you have a news blog, published date might be your first choice. But for the rest of the sites like mine a URL which shows the ‘category/post’ in it, is the best choice I can think of unless you are including one post in more than one categories. If that is the case then you can include some other parameters as per your choice. However, the steps still remains the same. 


I wanted my URL’s to show the category and the post name, which will be: http://example.com/category/postname. 


For this I tried editing Permalink via ‘Permalink Settings’. Here are the steps how I did it.


1.       Go to ‘Permalink Settings’ under settings on your Left Hand Side in the WP dashboard. 


2.     Select ‘Custom Structure’. Enter the format  /%category%/%postname%/ in the text box infront of the ‘Custom Structure'.


3.    Click on ‘Save Changes’. 

4. You can see the ‘mod_rewrite’ code below the ‘Save Changes’ button. Now go and check your ‘.htaccess’ file among website files and make sure if the same code is written there. If it is not automatically written there, you can copy the same code listed here and paste it in your ‘.htaccess file’. (If you are not sure how to do it, you can refer here.


Your Permalink will now be updated and the pages should be working fine. 


However, sometimes like in my case you might get a ‘404 error’ when you go choose the category from the menu which is actually supposed to display all the posts in that category. When I clicked on individual posts, they worked fine, but not the categories. 

Later I found out this was due to some mash up in the code for detecting the category base. So I decided to edit the code. Once I disabled the code by commenting them, the issue was fixed. If you have similar issue, here are the steps how you can do it. 


1.       Install ‘Advanced Permalink’ plugin. 


2.       Once you install it, you can edit the code.  Go to ‘Advanced Permalinks’ under ‘Installed Plugin’. You see the ‘Edit ‘link under the Advanced Permalinks’ listed there. 


3.      Now search for the following code there and add ‘//’ in front of it.  

$this->add_filter ('category_rewrite_rules');


4.       Save the changes by clicking on ‘Update File’ button below. This should get your site categories up and working. 


This fixed my site. But if you have faced similar issue and have a different fix, please share with us. I'm sure there are other ways to fix this as well. Also, if you have any related issue, please share with us, so that we can together try and find a way to resolve them. 


Share this Post Share to Facebook Share to Twitter Pin This

Tuesday, 2 December 2014

How to post articles in different pages-WordPress

WordPress is the most efficient and advanced website builder I have ever used. However, the interface and the options available can be quite confusing for beginners.

I had been trying to find a way to be able to post in different pages. That is, I wanted my users to be able to choose a page each for a category and see the posts related to that category in that page. I was searching for an option to create different ‘post page’ for different categories, so that I could make a post in whichever page I wanted to. However, I couldn’t find an option to do so, since WordPress allows only one post page per site. You can create any number of static pages. But only one post page per site is possible.

Many suggested me to post under various categories. However, I was not sure this would get me what I wanted. I wanted my users to be able to choose the page related to particular category directly from navigation menu, where they could find all the posts related to that category. I searched a lot in blogs and forum. But couldn’t find exactly what I wanted. Even if there were few suggestions, they were too complicated. I knew there was something I was missing. It couldn’t be that complicated.

I had almost quit trying and accepted that I can only create categories and post to it and allow the users to see the categories in the side widget. But then I finally found out that I could add categories and posts along with the pages to the menu. This solved it all. Adding categories to the menu will let you list the categories in the navigation menu. Adding the posts under the related category in the menu will let you list the posts under that category in the navigation menu.

If that doesn’t explain enough, here are the detailed steps for the same. 


1. Create a post and add it to the category you wish. Here, I have created ‘Test Post’ and added to ‘Test’ category and published it. 


2. Now go to ‘Menu’ option under ‘Appearance’. 


3. Go to ‘Edit Menus’ and select the category previously created from the list on the left hand side. It will be listed under ‘Categories’.  Now click on ‘Add to Menu’. Select the post added just now and click on ‘Add to Menu’.


4. Now you can see them both listed under the menu on your right hand side. Drag the post and put it under the category name and save the menu.


5. Now when you go to your site and check, you can see that the post just made will be listed in the navigation menu under the same category.  If you click on the category name, you will see all the posts, you have made to that category.

This way you may not actually post under different pages, but you will be able to allow your users to see the posts made to different categories separately.  Please share with us if you have any alternate solutions for this issue. 


Share this Post Share to Facebook Share to Twitter Pin This

Follow Me